Security Cameras
How to connect the security cameras at your properties — install a Seayora Bridge with one command, connect DW Spectrum or a camera that sends to Seayora — then watch them live, record and play back, act on what they see, and export footage as evidence.
Security Cameras puts the cameras at your properties next to the units, leases and work orders they watch over. You can see every camera live on one wall, play back what they recorded, get told when one sees something or goes offline, turn an event into a work order, and export footage for the police or an insurer with a fingerprint anybody can check. It lives under Operations → Cameras on the website, and under Security Cameras in the Seayora app on iPhone and Android.
Where a camera may be
Common areas and outside only: entrances, the lobby, corridors, stairwells, elevators, the mail and package room, laundry, parking, the garage, the roof, the trash area, amenity spaces, the office and equipment rooms. Seayora refuses a camera anywhere else, and says why in the words of the law.
- Never inside a home somebody lives in. Recording a private dwelling is unlawful surveillance in essentially every state, and California says in terms that being the landlord is no defence.
- Never in a bedroom, a bathroom or restroom, or a changing or locker room — recording a private space is a felony in most states.
- Point cameras away from windows and front doors of units, or black those areas out with a privacy mask (below).
- Local law may require signs, notice to residents or staff, or limits on where cameras may point. Seayora shows every resident where each camera is and what it keeps, but that does not replace a notice the law requires you to give.
Connecting cameras
- Through a Seayora Bridge (recommended): a computer at the property — a mini PC, a Windows PC, a Mac, a Raspberry Pi or a NAS — finds the cameras on its network by itself, even behind a managed switch that filters the usual broadcast, and asks each one for its streams. Cameras that do not speak ONVIF — and recorders, including Hikvision, Dahua, Lorex and Amcrest NVRs and UniFi Protect — are added by their RTSP address; the bridge lists the ones it finds as “RTSP only”.
- From DW Spectrum, Nx Witness or Hanwha WAVE: connect the system and import its cameras. Seayora pulls each camera from the recorder, so nothing about the existing system changes. A recorder only reachable on the property’s network is imported through a bridge instead, and its password never leaves the property.
- A camera already on the internet: Seayora connects to it directly. Only for a camera published with a port forward — a bridge is safer for everything else.
- A camera that sends its video: many cameras can push to a server over RTMP or SRT. Seayora gives you an address and a stream key to paste into the camera. SRT copes better with cellular connections.
- Verkada, Eagle Eye, Rhombus and Avigilon Alta need a partner agreement Seayora does not have yet; cameras behind them can often still be added to a bridge by RTSP. Ring, Google Nest and Wyze cannot be connected to any other system, so Seayora says so rather than offering a button that fails.
The Seayora Bridge
The bridge is a small program that runs on a computer that stays on at the property, on the same network as the cameras. It needs no open ports: it only connects out to Seayora. It finds the cameras, keeps their passwords, records to its own disk, takes pictures, and forwards video to the cloud only while somebody is watching or a recording policy says to — so a building with twenty cameras is not uploading twenty streams all day. You download it from Seayora itself, and afterwards it keeps itself up to date with releases Seayora has signed.
| The computer | What it needs | The bridge runs as |
|---|---|---|
| Linux or Raspberry Pi — Ubuntu, Debian, Raspberry Pi OS, Fedora, RHEL and most others | A 64-bit PC (Intel, AMD or ARM), or a Raspberry Pi 3, 4 or 5, with systemd | A service, under a user of its own |
| Windows | Windows 10 version 1809 or later, Windows 11, or Windows Server 2019 or later, on Intel, AMD or ARM | A Windows service, under the Local Service account |
| Mac | macOS 13.5 or later, on Apple silicon or Intel | A background service, under a hidden user of its own |
| NAS or Docker — Synology, QNAP, Unraid, TrueNAS | Linux with Docker Engine | A container with host networking |
Wired is steadier than Wi-Fi, and a computer that sleeps stops recording, so switch sleep off. The disk decides how much footage the bridge can keep at the property; recordings can go to a separate, larger disk.
Install the Seayora Bridge
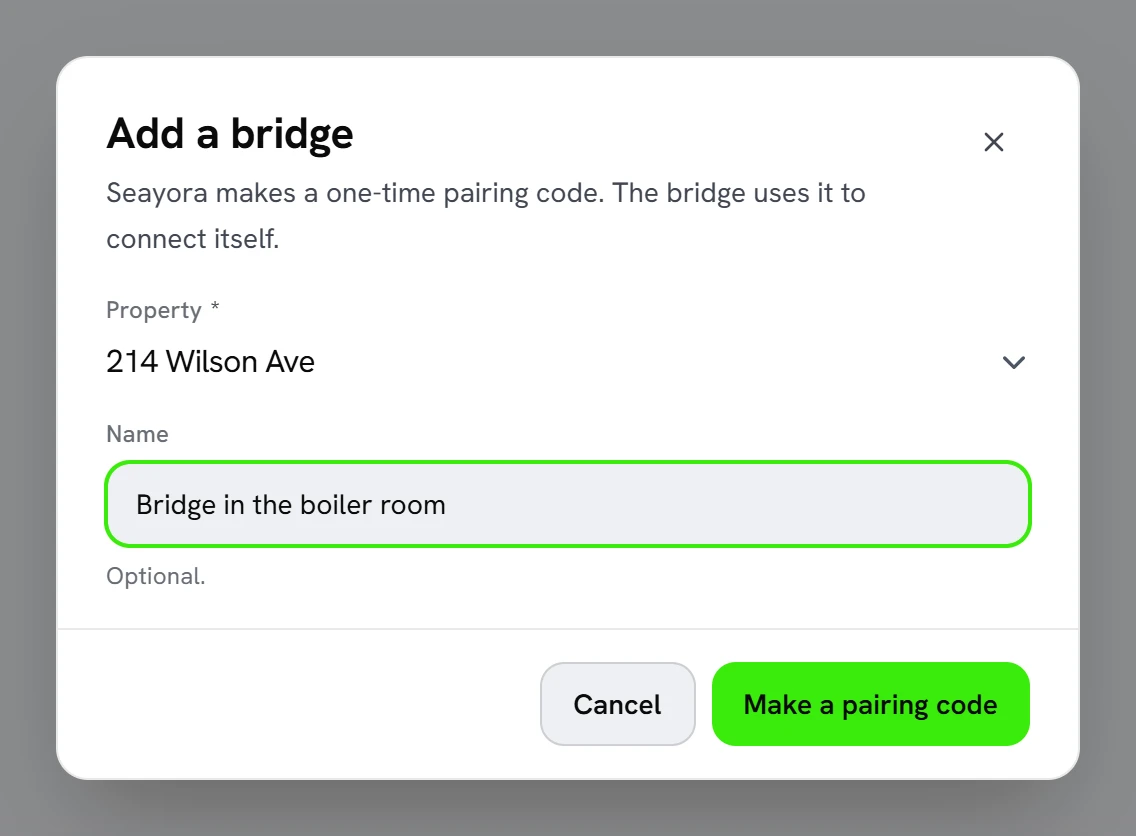
In Seayora, open Cameras, then Bridges, and press “Add a bridge”. Choose the property, give the bridge a name you will recognise, and press “Make a pairing code”.
Seayora shows a pairing code and, for each kind of computer, the one command that installs the bridge. The code works once, for thirty minutes, and Seayora keeps only a fingerprint of it.
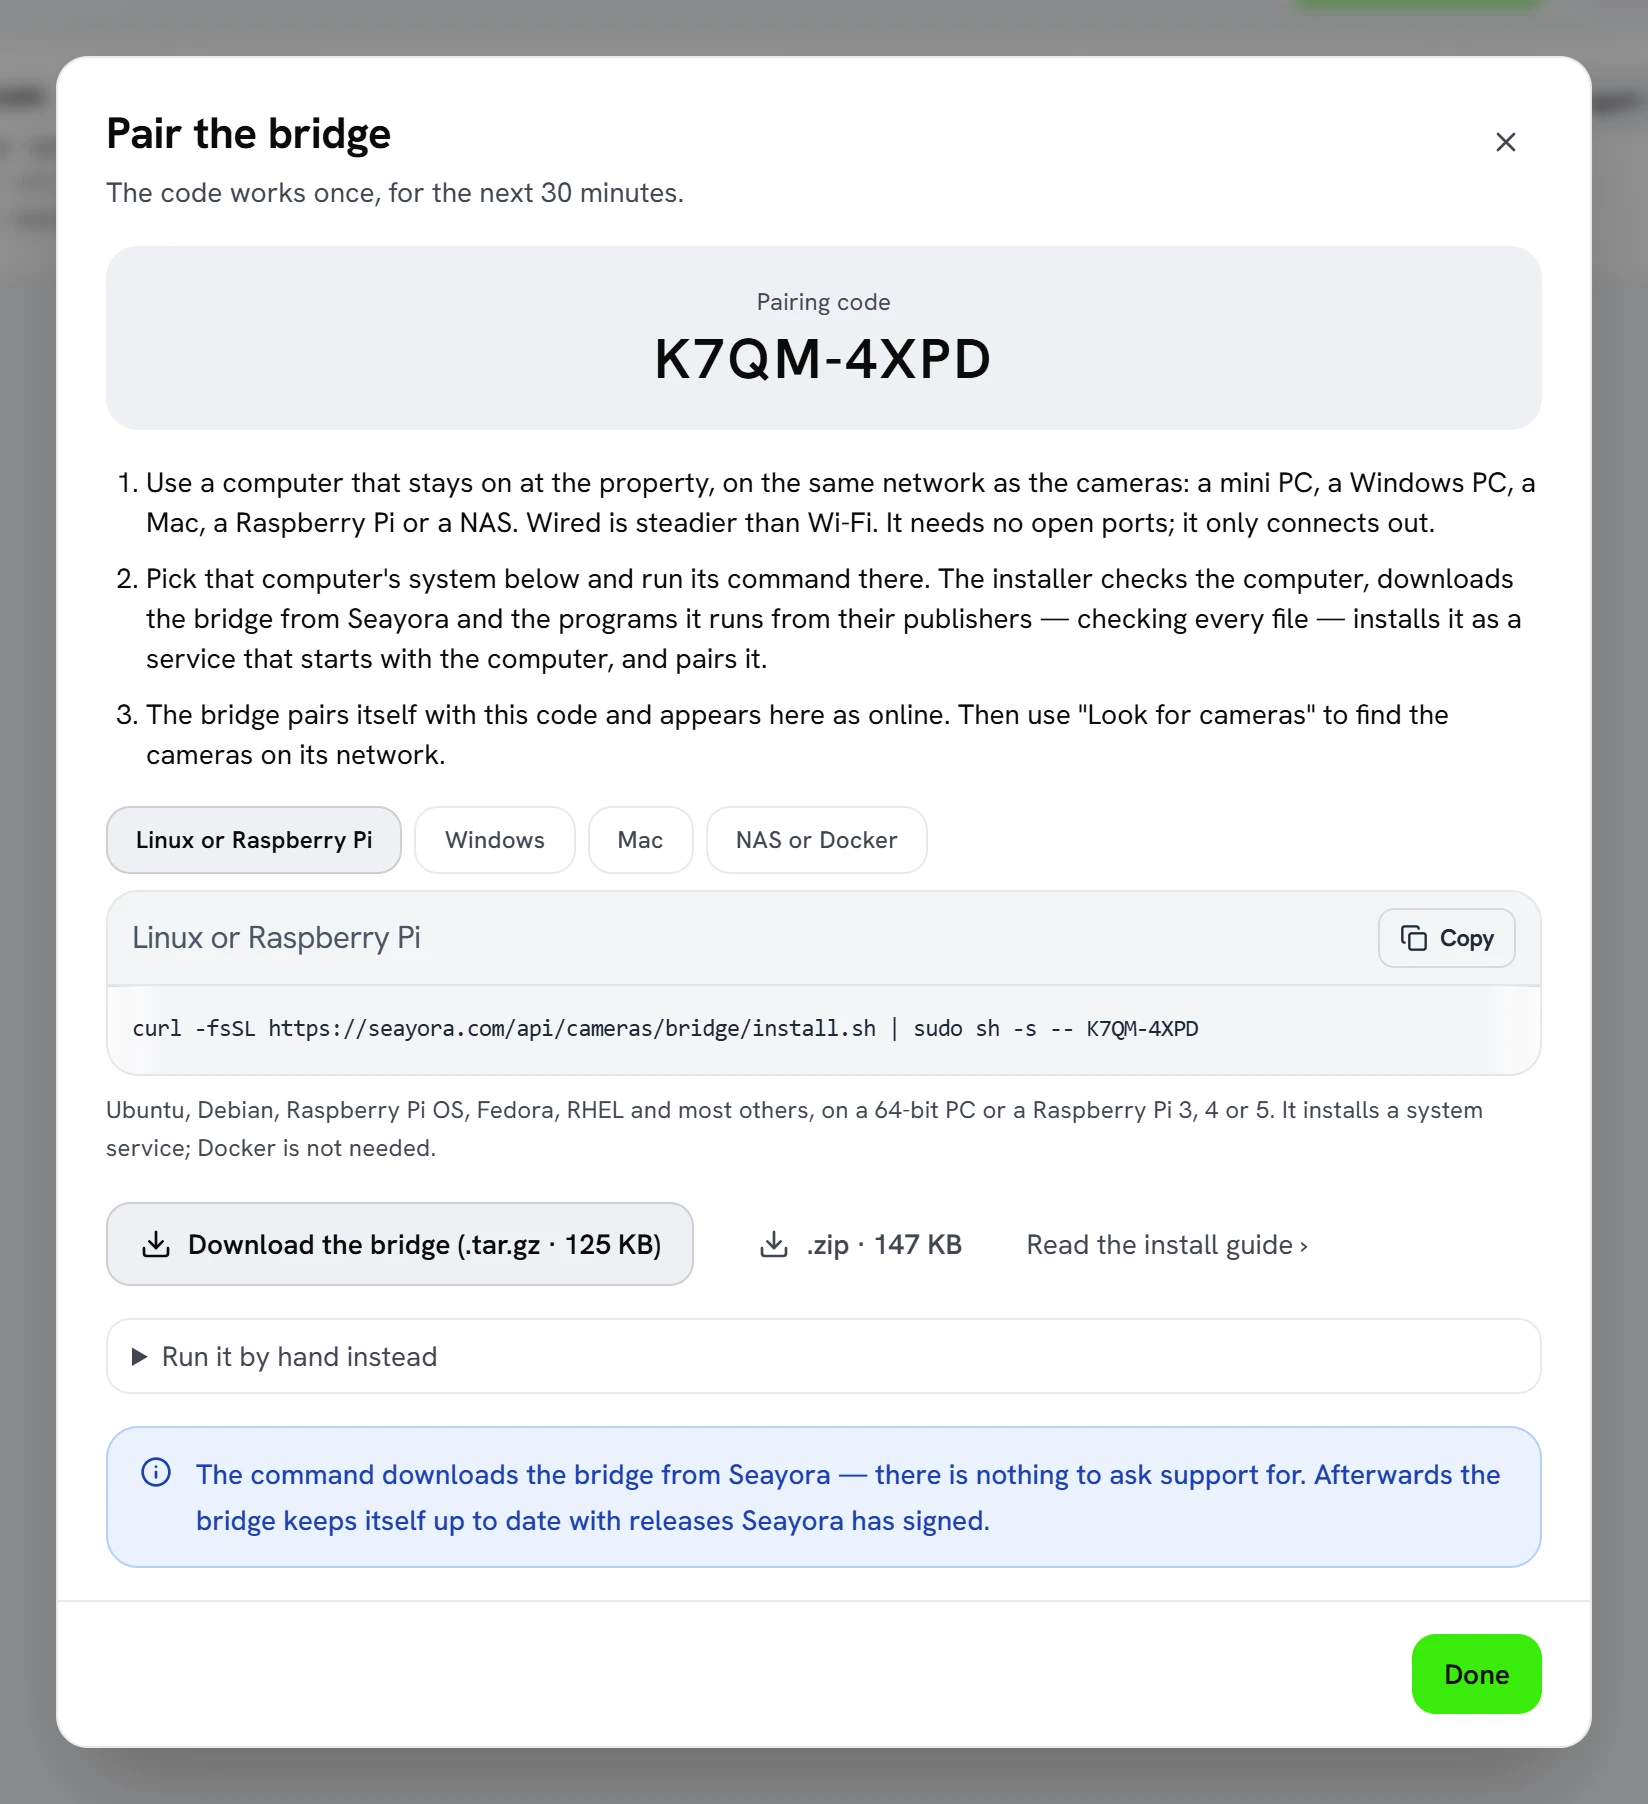
Pick the bridge computer’s system and run its command on that computer, exactly as Seayora shows it — with your own code in place of the one below. The installer checks the computer, downloads the bridge from Seayora and the programs it runs — Node.js, MediaMTX and FFmpeg — from their publishers (or the same files from Seayora, where the network blocks a publisher), checks every file against the fingerprint Seayora pinned, installs the bridge as a service that starts with the computer, and waits until it has paired. It takes a minute or two.
The pairing screen follows along: it says when the installer has started and when the bridge has paired, then offers “Look for cameras”. Is somebody else doing the install at the property? Press “Send the instructions” to share the code, the commands and this guide from your own phone or computer. The code works once, for thirty minutes, and Seayora never sends it anywhere itself.
On Linux or a Raspberry Pi
Open a terminal, or connect to the computer over SSH, and run:
curl -fsSL https://seayora.com/bridge | sudo sh -s -- ABCD-2345- Leave the code off — curl -fsSL https://seayora.com/bridge | sudo sh — and it asks for it.
- It needs sudo because it installs a service. The bridge itself runs as its own user, seayora-bridge, with no administrator rights.
- It installs into /opt/seayora-bridge, keeps its data in /var/lib/seayora-bridge and its settings in /etc/seayora-bridge/bridge.env, and adds the seabridge command (the older name, seayora-bridge, works too).
- The bridge and the programs it runs take about 300 MB. On a computer that already has FFmpeg, add --small to use it and save about 80 MB.
- To keep recordings on a larger disk, add --recordings and a folder on it: … | sudo sh -s -- ABCD-2345 --recordings /mnt/disk/seayora.
- On a 32-bit Raspberry Pi OS it uses the system’s own FFmpeg, and installs it with the package manager if it is missing.
- It needs systemd, which every mainstream distribution has. Without it, use Docker (below).
On Windows
Open PowerShell — right-click the Start button and choose Terminal or Windows PowerShell — and run the command below. It asks Windows for administrator rights by itself and carries on in a new window:
$env:SEAYORA_PAIRING_CODE='ABCD-2345'; irm https://seayora.com/bridge.ps1 | iexFrom Command Prompt, the same in one line — it asks for the code:
powershell -ExecutionPolicy Bypass -c "irm https://seayora.com/bridge.ps1 | iex"- Windows 10 version 1809 or later, Windows 11, or Windows Server 2019 or later.
- It installs into C:\Program Files\Seayora Bridge and keeps its data in C:\ProgramData\Seayora Bridge. The bridge runs as the “Seayora Bridge” service under Windows’ built-in Local Service account, which has no administrator rights, and starts with Windows.
- It adds the seabridge command to every new terminal and, for a PC whose firewall blocks outgoing traffic, Windows Firewall rules that let the bridge’s own programs out. Nothing inbound is opened.
- It uses the proxy Windows is already set to use. To name another, run $env:SEAYORA_PROXY='http://proxy.example:3128' in the same window first.
- The code goes into a setting of that PowerShell window, never into the web address, so it does not end up in a log anywhere.
- Or, without PowerShell: download the .zip on the pairing screen, unpack it, and double-click Install Seayora Bridge. Windows asks whether to run it and for permission to make changes; then type the pairing code. Press Enter with no code to update a bridge that is already paired.
- To keep recordings on another disk, run $env:SEAYORA_RECORDINGS_DIR='D:\Seayora' in the same window first.
On a Mac
Open Terminal (in Applications, then Utilities) and run the same command as on Linux. It asks for your password, because it installs a background service:
curl -fsSL https://seayora.com/bridge | sudo sh -s -- ABCD-2345- macOS 13.5 or later, on Apple silicon or Intel.
- It installs into /usr/local/seayora-bridge, keeps its data in /Library/Application Support/SeayoraBridge and its log in /Library/Logs/SeayoraBridge, and runs the bridge as a hidden user of its own. If the Mac’s firewall is on, it lets the bridge through.
- A Mac that sleeps stops the bridge. In System Settings, switch on “Prevent automatic sleeping when the display is off” (under Energy, or Battery, then Options, on a laptop) — or use a Mac mini.
On a NAS or with Docker
On a NAS or any Linux computer with Docker Engine, connect over SSH and add --docker to the Linux command:
curl -fsSL https://seayora.com/bridge | sudo sh -s -- ABCD-2345 --docker- The container uses host networking so it can see the cameras. Docker Desktop on a Mac or a Windows PC cannot — use the Mac or Windows installer there instead.
- It installs into /opt/seayora-bridge-docker, and the container starts again by itself after a reboot.
- Synology (Container Manager), QNAP (Container Station), Unraid and TrueNAS SCALE all run it once SSH is switched on. A container manager that runs Compose projects can also run the folder from the file (below) as a project; it still needs host networking.
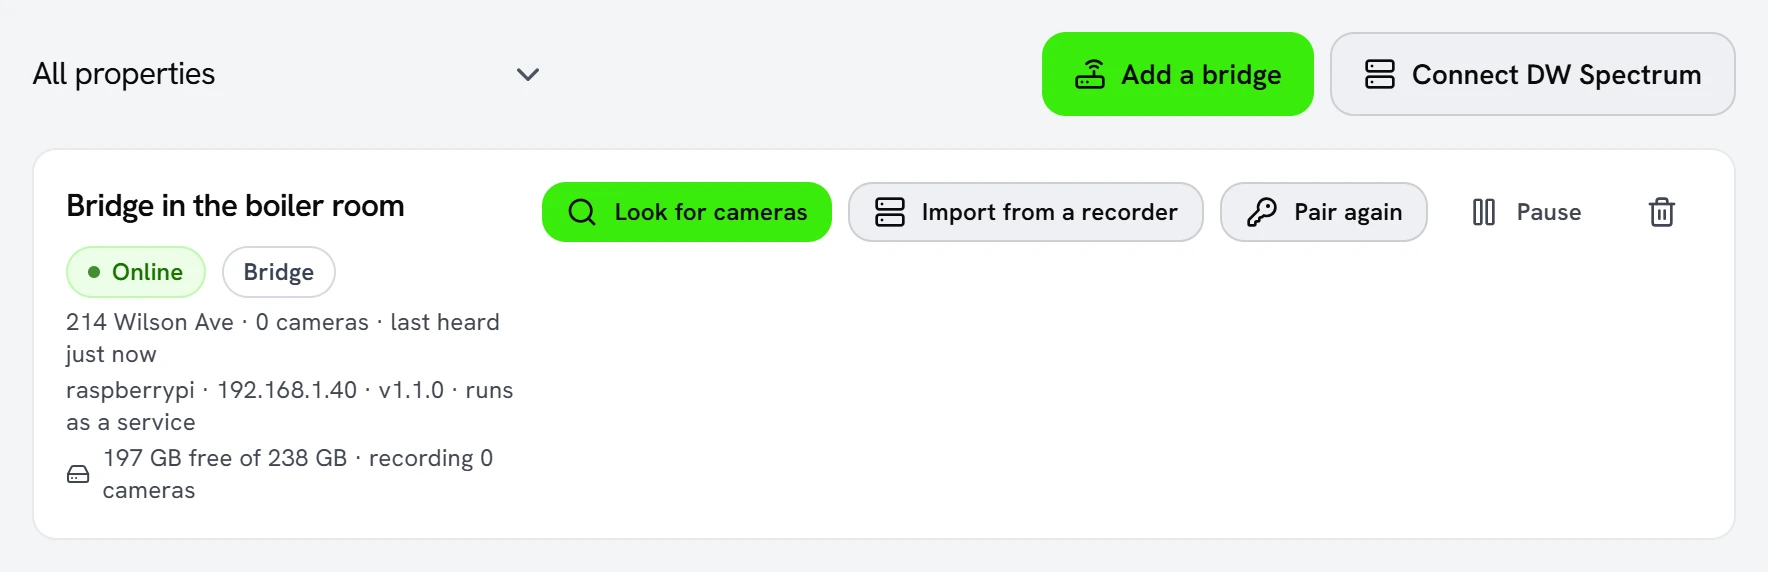
Back in Seayora the bridge now shows as online, with the computer’s name, its address on the property’s network, its version and how it was installed.
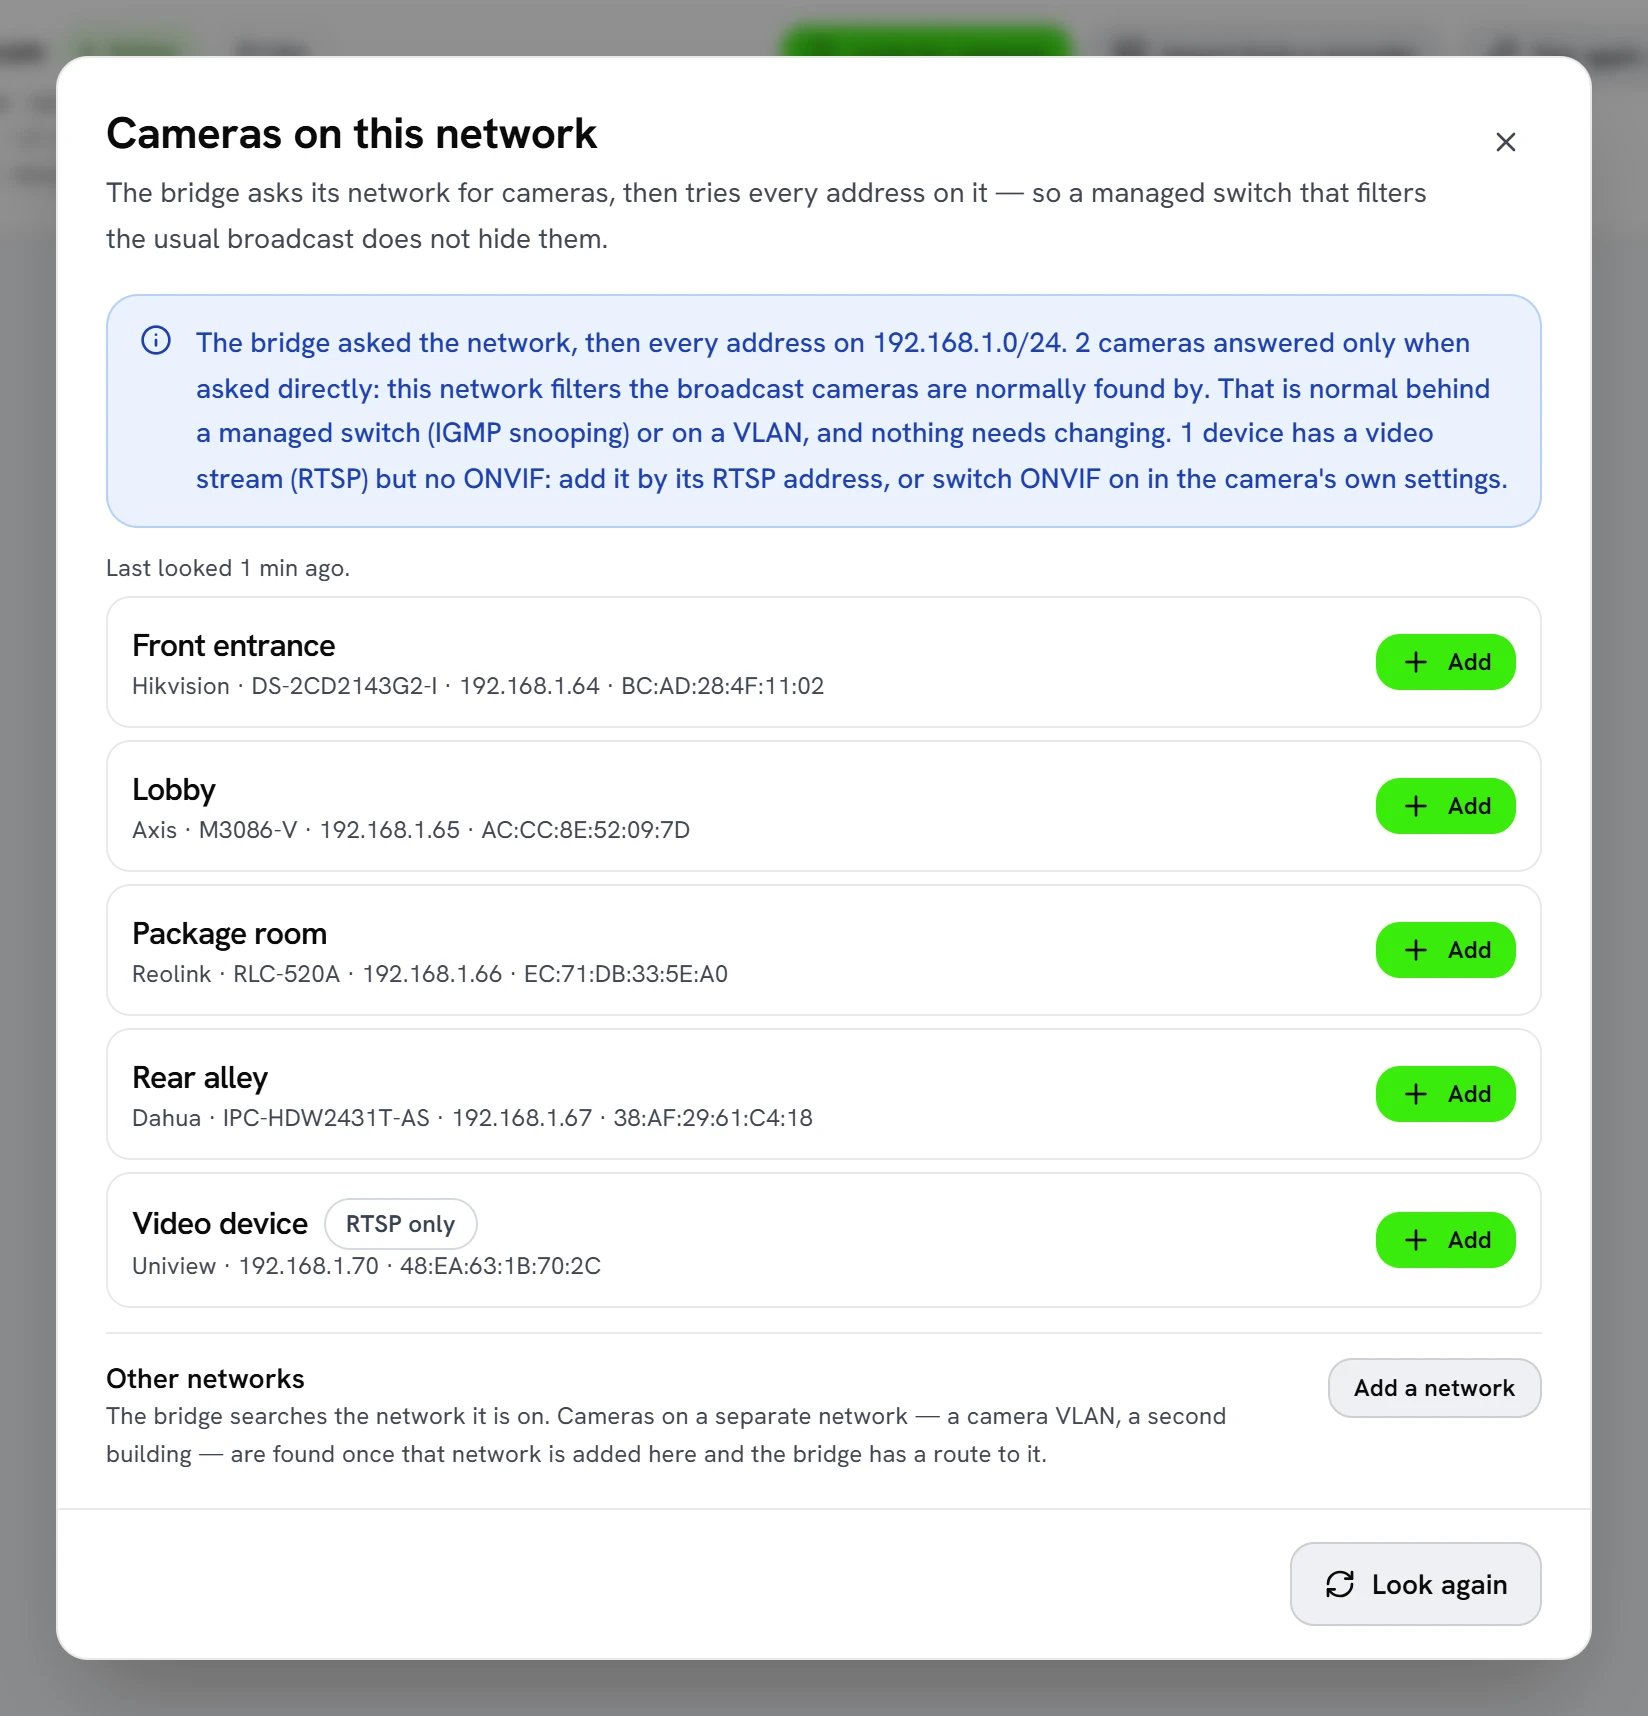
Press “Look for cameras” — a bridge that has just paired is searched straight away. Tick the cameras you want (or “Choose all”), choose where they are and their username and password, and press Add: each becomes its own camera, with the password sealed on your device to the bridge’s key. A camera with a different password can be changed afterwards from its own settings, and “Add” on a single row opens the full setup for one camera. The bridge asks its network, then tries every address on it, so a camera appears even when the network filters the usual broadcast — the screen says when that happened. A device with a video stream but no ONVIF is listed as “RTSP only” and added by its RTSP address.
Networks, switches and VLANs
- The bridge finds cameras three ways: it asks the network (ONVIF WS-Discovery and SSDP), then asks every address on it directly, then checks the ports cameras stream video on. A managed switch with IGMP snooping — most business switches — often drops the broadcast cameras are normally found by; the direct search finds them anyway, and nothing on the switch needs changing.
- It searches the private networks the computer is connected to. On a network larger than /22 it searches the /24 around its own address, and it never searches more than 4,096 addresses at once.
- Cameras on a separate network — a camera VLAN, a second building — are found once that network is added under “Other networks” on the discovery screen, for example 10.0.20.0/24, and the bridge computer has a route to it. Seayora accepts private networks only, none wider than /20, up to 16.
- A camera whose address changes — the router handed it a new one — is followed. The bridge recognises it by its hardware address or its ONVIF identity, carries on at the new address, and Seayora updates the camera to match.
- Outgoing connections only, and HTTPS to seayora.com is all it needs — the list for IT, the proxy and certificate settings, and what it does when a firewall blocks the media port are just below.
For IT: what the bridge needs from the network
| To | Port | What for | Needed? |
|---|---|---|---|
| seayora.com | TCP 443 (HTTPS) | Pairing, settings, events, pictures and updates — and video, when the next line is blocked | Yes |
| media.seayora.com | TCP 8322 (RTSP inside TLS) | Live and cloud video, while somebody watches or a camera records to the cloud | No: without it the bridge sends video over port 443 through seayora.com, by itself |
| nodejs.org, github.com, ffmpeg.martin-riedl.de, registry.npmjs.org | TCP 443 | The programs the bridge runs, when it is installed or needs new ones | No: Seayora hands out the same files, checked against the same fingerprints |
| The cameras, on the property’s own network | RTSP 554, ONVIF over HTTP (80, 8000, 8080), WS-Discovery UDP 3702, SSDP UDP 1900 | Finding the cameras and reading their video | Yes, on the local network only |
- Nothing inbound, ever: no port forward and no open port on the router or on the bridge computer. Its recorder listens on the computer itself (127.0.0.1) only.
- A network that lets out only web traffic still works: the bridge tries the media server’s own port, and when that is blocked it sends the same video inside an ordinary HTTPS connection to seayora.com, where it is still checked against the bridge’s token. Seayora says under the bridge which route it is using. To start on that route, set SEAYORA_MEDIA_ROUTE=tunnel before installing (auto is the default; direct never uses port 443 for video).
- Behind a proxy, add --proxy http://proxy.example:3128 to the Linux or Mac command (a user name and password can go in the address); on Windows the proxy the computer already uses is picked up by itself, or set SEAYORA_PROXY first. The proxy only relays the encrypted connection: the bridge checks Seayora’s own certificate through it. NO_PROXY is honoured; SOCKS is not supported.
- A firewall that inspects HTTPS with its own certificate: the bridge trusts the computer’s own certificate store — where IT puts that certificate — as well as its own list, so this usually just works. Otherwise add --ca-file and the certificate in PEM form (SEAYORA_CA_FILE on Windows); the installer copies it beside the bridge so the service can read it. The bridge never stops checking certificates.
- A network that allows seayora.com and nothing else: add --via seayora to fetch every program through Seayora.
- sudo seabridge doctor, run on the bridge computer, checks every line of this — including both video routes and each camera — and says what to fix.
How the bridge keeps itself safe
- Every release is signed by Seayora (Ed25519). Each time the bridge starts it checks every one of its files against that signature; if anything differs, Seayora says so in red under the bridge, and the bridge keeps recording while you put it right with the update command.
- The installer checks the same signature before anything is installed, and refuses a copy that is not Seayora's — so a download altered on the way, by a firewall that inspects HTTPS or anything else between the computer and Seayora, is not installed and nothing on the computer is changed. It also refuses a download that did not arrive with Seayora's fingerprint at all.
- It runs as its own user with no administrator rights. On Linux the service is locked down further: the rest of the system is read-only to it, home folders are hidden from it, and it cannot gain privileges.
- Its private key and token live in its data folder, readable only by the bridge. Camera passwords are sealed to that key in your browser or on your phone before they are sent, so Seayora stores them in a form it cannot read.
- It checks the certificate of every server it connects to, never sends its token on to wherever a redirect points, and never runs a download it has not checked against its SHA-256 fingerprint.
- It searches private networks only, and only the ones it is connected to or you added.
Updates
- The bridge keeps itself up to date. Every six hours it asks Seayora for the latest release, downloads it and checks every file against Seayora’s signature, then switches over between 1 and 5 in the morning by its own clock, when nobody is watching live and no clip is being uploaded. It never moves to an older release.
- A new release is on trial until it has reached Seayora. If it cannot — it stops three times, or fifteen minutes pass — the bridge goes back to the version it had by itself, never tries that release again, and Seayora says so under the bridge.
- A release that needs a newer MediaMTX or FFmpeg is installed by the installer, not by the bridge: Seayora says so, and you run the update command below.
- To update at another time, set SEAYORA_UPDATE_WINDOW (for example 02-04, or any) before running the installer. To update only by hand, set SEAYORA_AUTO_UPDATE=0 and run the update command when you choose.
The update command installs the latest release and puts right anything that changed. The bridge keeps its pairing, so nothing is paired again and no camera password needs entering again:
sudo seabridge updateOn Windows, run seabridge update in a terminal opened as Administrator. Both run the same installer as the commands below, which also update a bridge installed before the seabridge command existed:
curl -fsSL https://seayora.com/bridge | sudo sh -s -- --update$env:SEAYORA_UPDATE='1'; irm https://seayora.com/bridge.ps1 | iexIn Docker, add --docker to the Linux command. To remove the bridge, run seabridge uninstall — or use --uninstall in place of --update (SEAYORA_UNINSTALL on Windows). Its data and recordings are kept unless you add --purge (SEAYORA_PURGE). Retire it in Seayora as well, so its token stops working.
- The data folder holds the bridge’s key and token. Back it up, never share it, and never delete it: a bridge that loses it has to be paired again, and every camera’s password entered again in Seayora.
- Camera passwords are sealed in your browser — or on your phone — to the bridge’s own key before they are sent, so Seayora stores them in a form it cannot read. If the bridge is paired again with a new key, the camera screens say which passwords need entering again.
- Moving to new hardware: use “Pair again” rather than adding a second bridge, and the cameras stay attached.
Installing from the file instead
If you would rather read what you are installing before you run anything, press “Download the bridge” on the pairing screen: a .tar.gz, or a .zip for Windows, of about 200 KB. It is the release the command installs; release/release.json inside it lists every file with its SHA-256 fingerprint, and Seayora signs that list. The installer inside is the same script the one-line command runs. From the unpacked folder:
tar -xzf seayora-bridge-1.4.0.tar.gz
cd seayora-bridge
sudo sh install.sh ABCD-2345
On Windows, unblock the .zip first (right-click it, then Properties, then Unblock), unpack it, and in PowerShell opened as Administrator in that folder:
$env:SEAYORA_PAIRING_CODE='ABCD-2345'
powershell -ExecutionPolicy Bypass -File .\install.ps1
Either way the installer still fetches the release from Seayora and checks it against the signature, so what runs is exactly what Seayora signed. To run it in Docker from the folder instead, run SEAYORA_PAIRING_CODE=ABCD-2345 docker compose up -d --build there; docker logs -f seayora-bridge shows it pair.
Checking on a bridge
On the bridge computer, seabridge status says what the bridge is doing, and seabridge doctor checks everything it depends on — the programs it runs, its files against Seayora’s signature, its data folder and disk, the networks it is on, the proxy, DNS, the computer’s clock, the connection to Seayora, both routes to the media server (its own port and port 443), whether the programs’ publishers can be reached, and whether each camera answers — and says what to fix:
sudo seabridge doctor
sudo seabridge status
sudo seabridge logs
sudo seabridge restart
On Windows, the same commands without sudo, in a terminal opened as Administrator. In Docker: docker exec seayora-bridge node launcher.js doctor. The older forms — seayora-bridge --doctor and --status — still work.
Watching live
The Live tab is a wall of every camera — 1, 4, 9 or 16 at a time, or one large with five or seven around it. Arrange a wall and save it as a layout, share it with your team, and set it to tour (move on by itself) for a screen at the front desk. The wall uses each camera’s smaller stream so a grid does not overwhelm a laptop; a single camera asks for the best the camera has. On a slow connection, switch the wall to Pictures. A tile scrolled off screen stops streaming.
Live video starts over WebRTC and falls back to HLS where a network blocks it. A camera behind a bridge starts streaming when somebody opens it, so the first picture can take a few seconds — the tile says “Starting the camera at the property” while it does.
Recordings and the timeline
- Each camera records always, when something happens (a few seconds before and after each event — the usual choice), on a weekly schedule in the property’s own time zone, or not at all (live only).
- Footage is kept on the bridge, in Seayora’s cloud, or both, for 1 to 365 days, then deleted automatically — unless the camera is on legal hold.
- Footage in Seayora’s cloud counts against your cloud storage allowance. When it is full, the oldest footage is deleted first or cloud recording pauses — you choose, under Cloud storage, where you also choose what goes first (the oldest, or footage in which nothing moved) and which cameras give up footage first. Footage on legal hold, in an export or a live share, and bookmarked moments are never deleted to make room. See Seayora Storage.
- Footage on a bridge loops: new footage keeps being saved, and when the bridge’s disk — or the space you gave recordings under Recording space on the bridge — runs out, the oldest goes first. You can choose quiet footage first instead (the most recent hours always stay), or stop recording when it is full. It always keeps part of the disk free, and never removes the piece being recorded, anything on legal hold or a bookmarked moment. The bridge’s card shows how much it keeps and about how many days of room are left.
- Open a camera and click its timeline to play from any moment. The timeline shows what is recorded in the cloud and on the bridge as separate rows, with every event and bookmark marked on it. A camera recording “when something happens” is supposed to have gaps.
- Rewind from live in one tap — 10 seconds, 30 seconds, a minute or five — on the website and in both apps. On a computer, the left arrow does the same.
- While a recording plays: skip back or forward 10 or 30 seconds, step a frame at a time, play at anything from a quarter speed to 16 times, and jump to the previous or next event — only of the kinds you picked on the timeline, if you picked some.
- Playback carries on by itself into the next recording, skipping any gap and saying so, until it catches up with now and goes back to live.
- The clock over the picture is the building’s. Cloud footage is played one unbroken stretch at a time, so its clock is exact; footage fetched from a bridge says “About”, because the bridge may have skipped a gap. Click a moment where nothing was recorded and it plays from where the footage picks up, and says so.
- Zoom the timeline from 15 minutes to 7 days, go straight to a date and time — typed in the property’s time zone — show only some kinds of event, and point at an event to see its picture before you play it.
- Keyboard shortcuts on the website: Space plays and pauses, the arrows skip 10 seconds (a minute with Shift), comma and full stop step a frame, minus and plus change the speed, [ and ] go to the previous and next event, F is full screen, M is sound, L goes back to live, and ? lists them all.
- In the apps, Recent events under the picture shows the latest events with their pictures; tap one to play it from a few seconds before.
- Footage kept on the bridge is fetched when you ask for it, so playing it can take a minute; cloud footage plays at once.
- Every time on these screens is the property’s local time, because footage is evidence about a place.
Events and rules
Cameras and recorders report motion, people, vehicles, animals, packages, a line crossed, somebody entering a zone or loitering, tampering, a doorbell, an alarm input, and going offline and back. They land in the Events tab with a picture where the camera sent one, until somebody acknowledges or dismisses them. A camera or recorder that can call a web address when it sees something — Hikvision, Axis, DW Spectrum’s “Do HTTP request” — can report to its own event address, found under the camera’s Connection settings.
- A rule watches a property (or some of its cameras) for some kinds of event, optionally inside hours and days you choose, and then alerts in the app, emails, raises a work order, bookmarks the timeline, or keeps a clip of the moment in the cloud.
- A rule waits between alerts (ten minutes unless you change it), so ten motion events in a minute page somebody once.
- Emails and alerts go only to people who run the property.
- AI descriptions are off unless you switch them on for a camera. When on, a short description of each event’s picture is written by a model, labelled as AI-written, and never identifies anybody.
Moving a camera
A pan-tilt-zoom camera behind a bridge shows a pad on its page: hold an arrow to move and let go to stop, zoom in and out, go home, go to a saved position, or save the current one.
Privacy masks and motion zones
Draw black shapes over anything a camera should not show — a neighbour’s window, a unit’s front door, a keypad. Masks cover the live view, pictures and playback on every screen, and on a bridge they are burned into exports. Motion zones do the opposite job: they tell a bridge where movement counts, so trees and a busy street stop setting off events.
Motion detection and tracking
A Seayora Bridge can watch a camera for movement itself. It is off unless you switch it on for a camera: Settings, then Motion detection, on the website or in either app. The bridge compares each moment of the camera’s smaller stream with the last few seconds, on the bridge computer at the property, and follows each thing that moves; it never identifies anybody, and each camera it watches uses some of that computer’s processor. A camera connected to Seayora directly relies on its own motion events instead.
- Set the sensitivity (1 to 10) and a separate one for night, how much of the picture must move (0.1% to 50%, of the motion zones when there are any), the smallest thing that counts (0.05% to 10% of the picture), for how long (0 to 30 seconds), how long to wait before raising another motion event (5 to 600 seconds), and the detail it looks at — standard, or high for small or distant things.
- It is more than comparing pictures: each part of the picture learns its own noise, so a grainy night picture needs a bigger change than a clean daytime one; a change in the whole picture’s brightness — the camera adjusting, a cloud — is ignored; lone specks are dropped; and, unless you switch it off, swaying trees, flags and water are ignored while they sway.
- Each thing that moves is followed on its own. A motion event carries when it started and stopped, where in the picture it happened, how many things moved and, unless you switch it off, the path each one took — drawn over the event’s picture on the website and in both apps.
- Lines: draw up to four lines on the camera’s picture on the website. Something crossing one raises a “Line crossed” event — either way, only the way its arrow points, or only against it.
- Loitering: choose how long one thing may stay in view — 10 seconds to 5 minutes — before a “Loitering” event is raised.
- Schedule: raise motion events only during the hours and days you choose, in the property’s time zone. Movement is still measured around the clock for the timeline and search.
- People, vehicles and animals: switch recognition on and the bridge also says what moved. It is open source (ONNX Runtime and the YOLOX-Nano model), downloaded by the bridge once, the first time you switch it on, and run on the bridge — no picture leaves it for this, and it never says who anybody is. Each person, vehicle or animal is its own event, so a rule can alert on people only; choose what to recognise and how sure it must be. “Only alert when a person, vehicle or animal is seen” cuts alerts from shadows, rain and headlights — and while the detector is not running, any movement still alerts, so a problem never looks like a quiet night.
- While it is on, motion the camera reports itself is ignored so nothing is reported twice. People, vehicles and packages the camera recognises still come through.
- The timeline shows a movement strip under the recordings: taller means more of the picture moved. Movement during the wait between events still shows there.
- Search motion: draw a box on the picture (on the website) or pick squares of a 3 × 3 grid (on the website and in both apps), choose how far back and how much must have moved, and Seayora lists the stretches of time and the motion events whose movement touched it, each with Play.
- A search finds only what the bridge measured while motion detection was on. That record, a movement level and the grid squares that moved for each minute, is kept for 35 days, separately from the footage.
- Anything under a privacy mask never counts as movement, and motion zones decide where movement counts.
- The camera’s page says whether the bridge is watching, starting, or could not start (with the reason), and whether the detector is ready, still downloading, or why it is not running.
Sound
Cameras record video only. Recording a conversation a camera is not part of can be unlawful interception under federal law wherever people expect privacy, and a number of states require the consent of everybody recorded. To switch sound on for a camera you type its name, confirm signs are posted, and accept a statement written for the state the property is in; it is stored word for word with your name and the time, and the owner is emailed if somebody else switched it on. We recommend leaving sound off.
Residents
Every resident sees, under My Home → Building cameras, where each camera in their building is, what it keeps and who can see it — whether or not they can watch it. You can let residents watch a particular camera live (the front door, the package room), and optionally play back the last few hours. A leasing or management office can never be shown to residents.
Who can watch, and the access log
- On a management company, “Security cameras” is a permission of its own: none, view or full. A view-only teammate can watch; downloading an export needs full access.
- A camera can be restricted to named people, which narrows who can watch it and never widens it.
- A management company can share a camera with the building’s owner, read-only.
- Seayora’s own support staff cannot open your footage.
- Every live view, playback, picture opened, export, share link made or opened, and change to a camera is written to the access log before it happens. Each entry carries the fingerprint of the one before it, so “Check the log” can tell you whether any entry was changed or removed. The log is kept for three years.
Evidence: exports, share links and legal requests
- Export up to an hour of footage at full quality, with a reason — the reason is part of the record. The file is fingerprinted (SHA-256) when it arrives and, where the server has a signing key, its manifest is signed. Exports are kept for 90 days, or until you release them if they are linked to a legal request.
- A share link hands an export, a clip or a live view to somebody outside — a detective, an adjuster, a lawyer — for up to a week (a day for live), with an optional passcode and a limit on how many times it can be opened. The link is shown once; every open is on the access log; you can withdraw it at any time.
- A legal hold stops a camera’s footage being deleted anywhere until you release it.
- Record subpoenas, warrants, police requests and insurance claims under Legal requests: who asked, by when, for which cameras and times, and which exports answered it. Seayora does not decide whether you must comply — that is a question for your lawyer.
Checking an export
Anybody can check a file at seayora.com/verify-footage. Their browser works out the file’s fingerprint — the file itself never leaves their computer — and Seayora says whether it is byte-for-byte an export it sealed, when, from which camera, and whether the signature still checks out. A file that was re-encoded, trimmed or converted will not match even though it shows the same footage.
AI assistants
An assistant connected to Seayora with the “Security camera status” permission can answer “is every camera recording?” and “did anything happen at the package room last night?” from the same data as this page. It never receives a picture, a recording or a live view, and it cannot acknowledge events, change a camera or share footage.
What Seayora does not do
- Seayora never identifies people by their face and does not offer licence-plate recognition.
- Seayora is not a monitored security service. Nobody at Seayora watches your cameras or events, and Seayora will never dispatch a guard or contact emergency services. If a person or property is at risk, call the emergency number for your area.
- Seayora sells and installs no hardware. A camera, recorder or bridge that fails, or a recording that was never made, cannot be recovered by Seayora.
Related features and guides
- Seayora Storage: Messages Media and Camera Footage — Documentation. How the media you send in Messages and the footage your cameras record in Seayora’s cloud are stored, how much is included, what happens when it is full, and how plans and billing work for an account or a company.
- Compliance Alerts & Required Filings — Feature. Seayora watches your properties for new violations and works out which recurring filings each building owes, turns both into a dated checklist, and emails you when something new appears. Live violation data for New York City; rule-based filing obligations across the NYC metro.
- Voice Notes in Messaging — Feature. Record and send voice notes in any Seayora conversation. Transcoded server-side so they play on iPhone, Android, and desktop alike, stored with the thread, and searchable as part of the property record.
- Check-Ins & Site Visits — Feature. Record staff check-ins at properties so inspections and site visits leave an auditable trail instead of a verbal report.
- Room Sizes and Floor Plans on a Listing — Documentation. Measure rooms by hand, with the camera or with an iPhone depth-sensor scan, and show their sizes — and a scanned room’s floor plan — on your listing. Every size says how it was measured.
- Connected Devices & Sensors — Documentation. How to connect meters, leak sensors, thermostats and other building devices to Seayora, what they can alert on, and how readings flow into work orders and Local Law 97 reporting.