Move-In & Move-Out Checklists
How to document a unit’s condition at move-in and move-out to protect both landlord and tenant when it’s time to return a deposit.
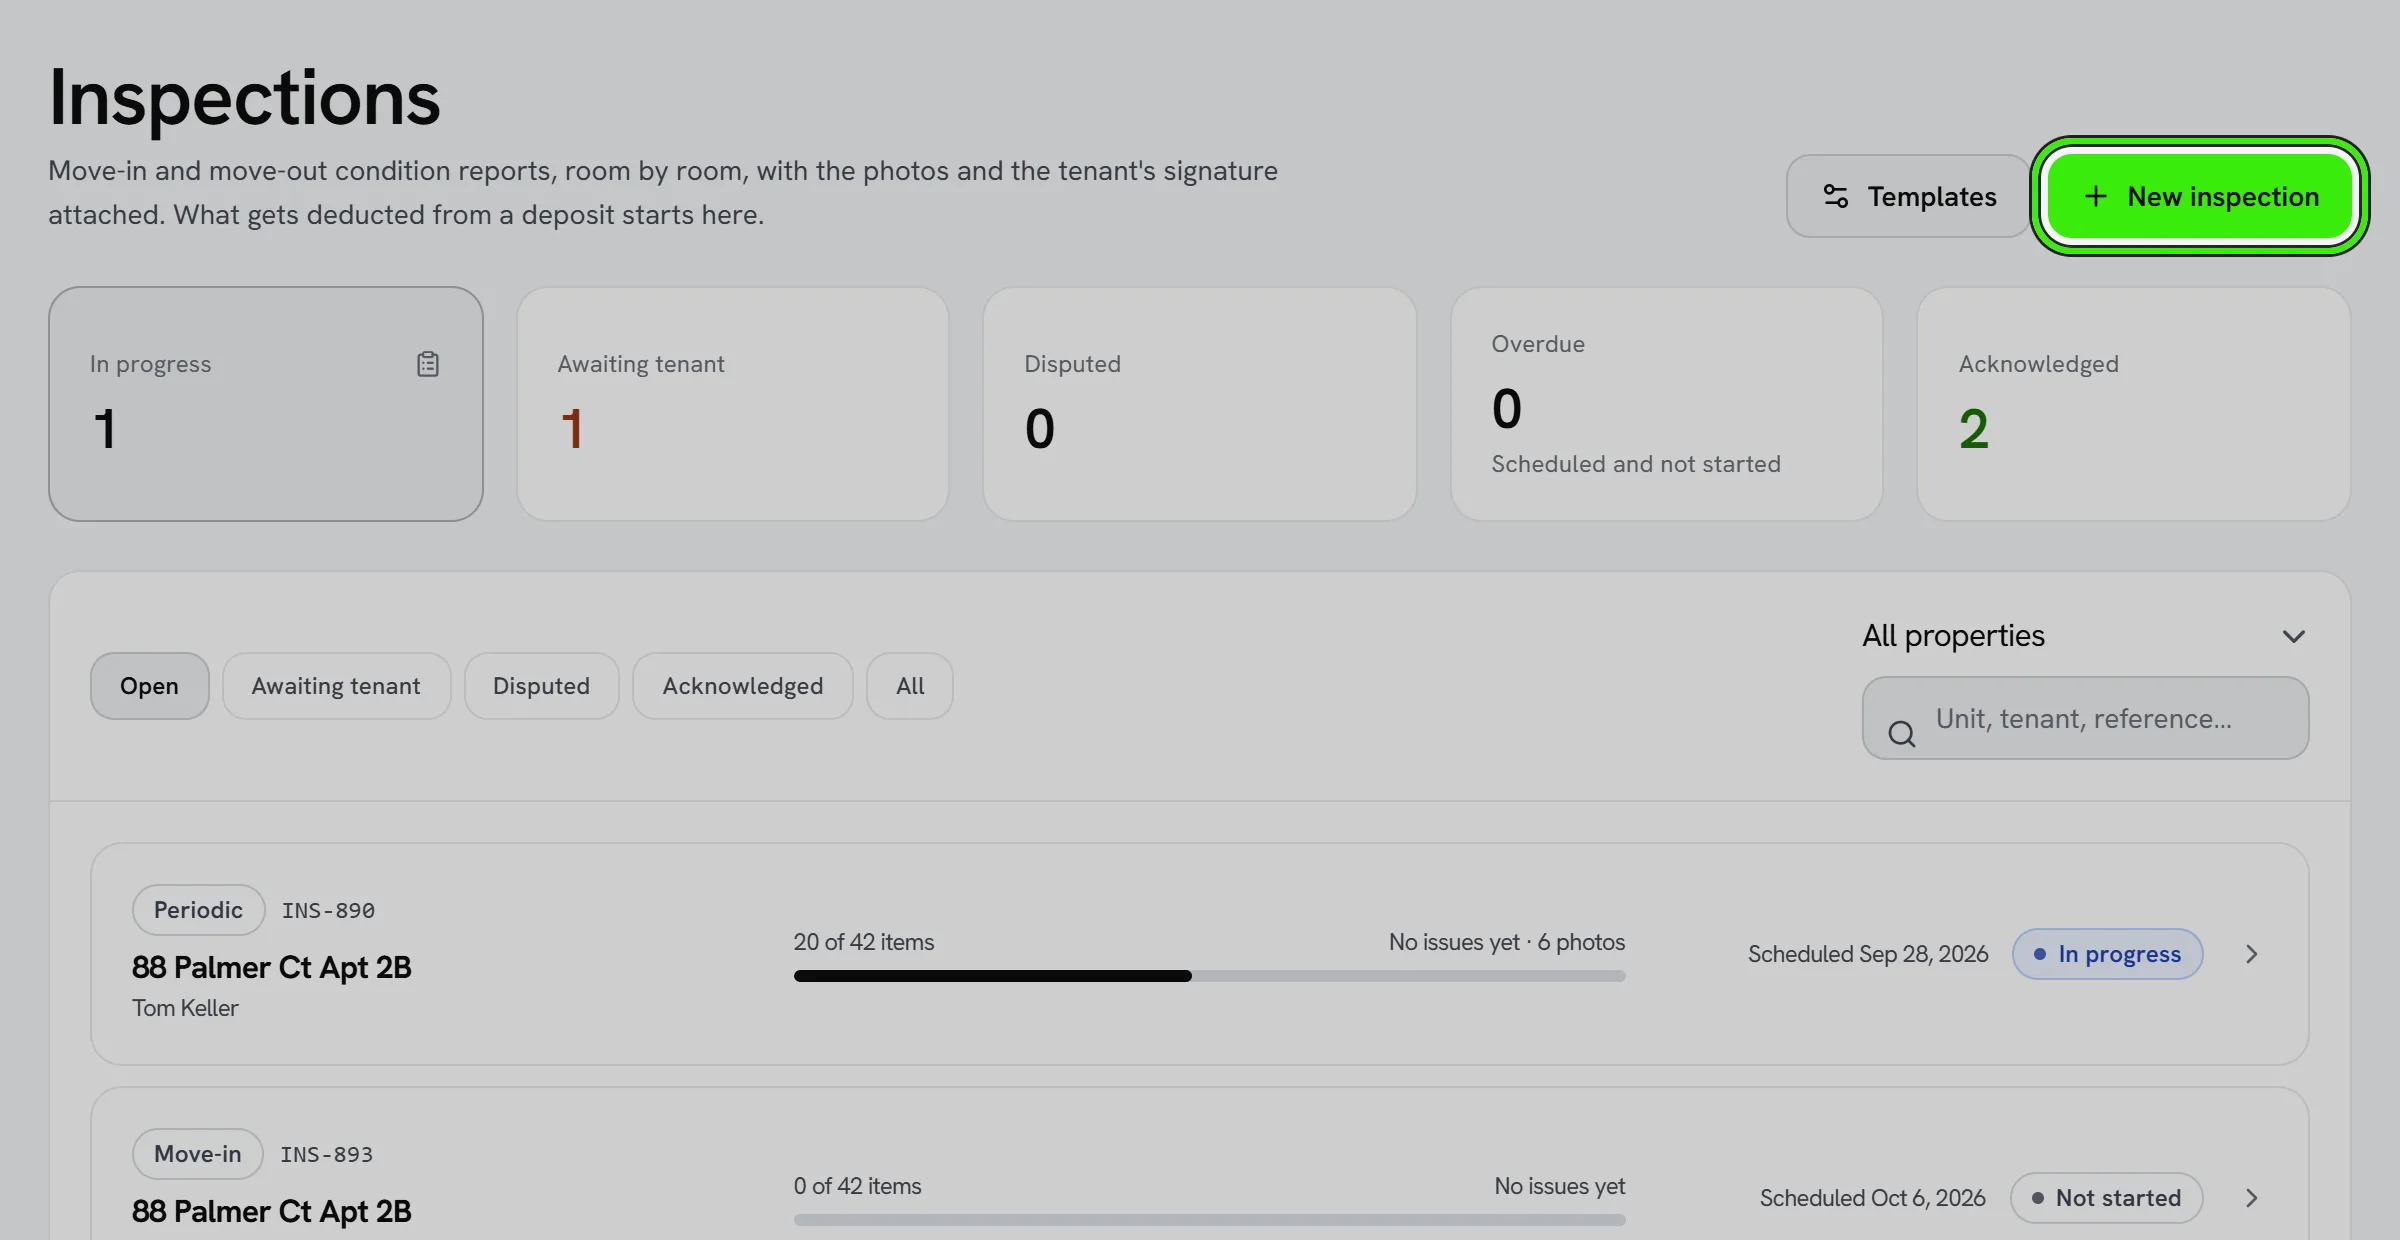
Most deposit disputes come down to one question: what condition was the unit really in? A documented checklist with photos answers it before an argument starts.
At move-in
- Walk the unit room by room with the tenant, or immediately after handoff.
- Photograph existing wear, damage, or issues.
- Have both sides acknowledge the condition report.
At move-out
Repeat the same walkthrough and compare against the move-in record. This is what separates normal wear and tear from damage that can be deducted from a deposit — and it’s far easier to agree on with photographic evidence from day one.
Finding somebody to carry it out
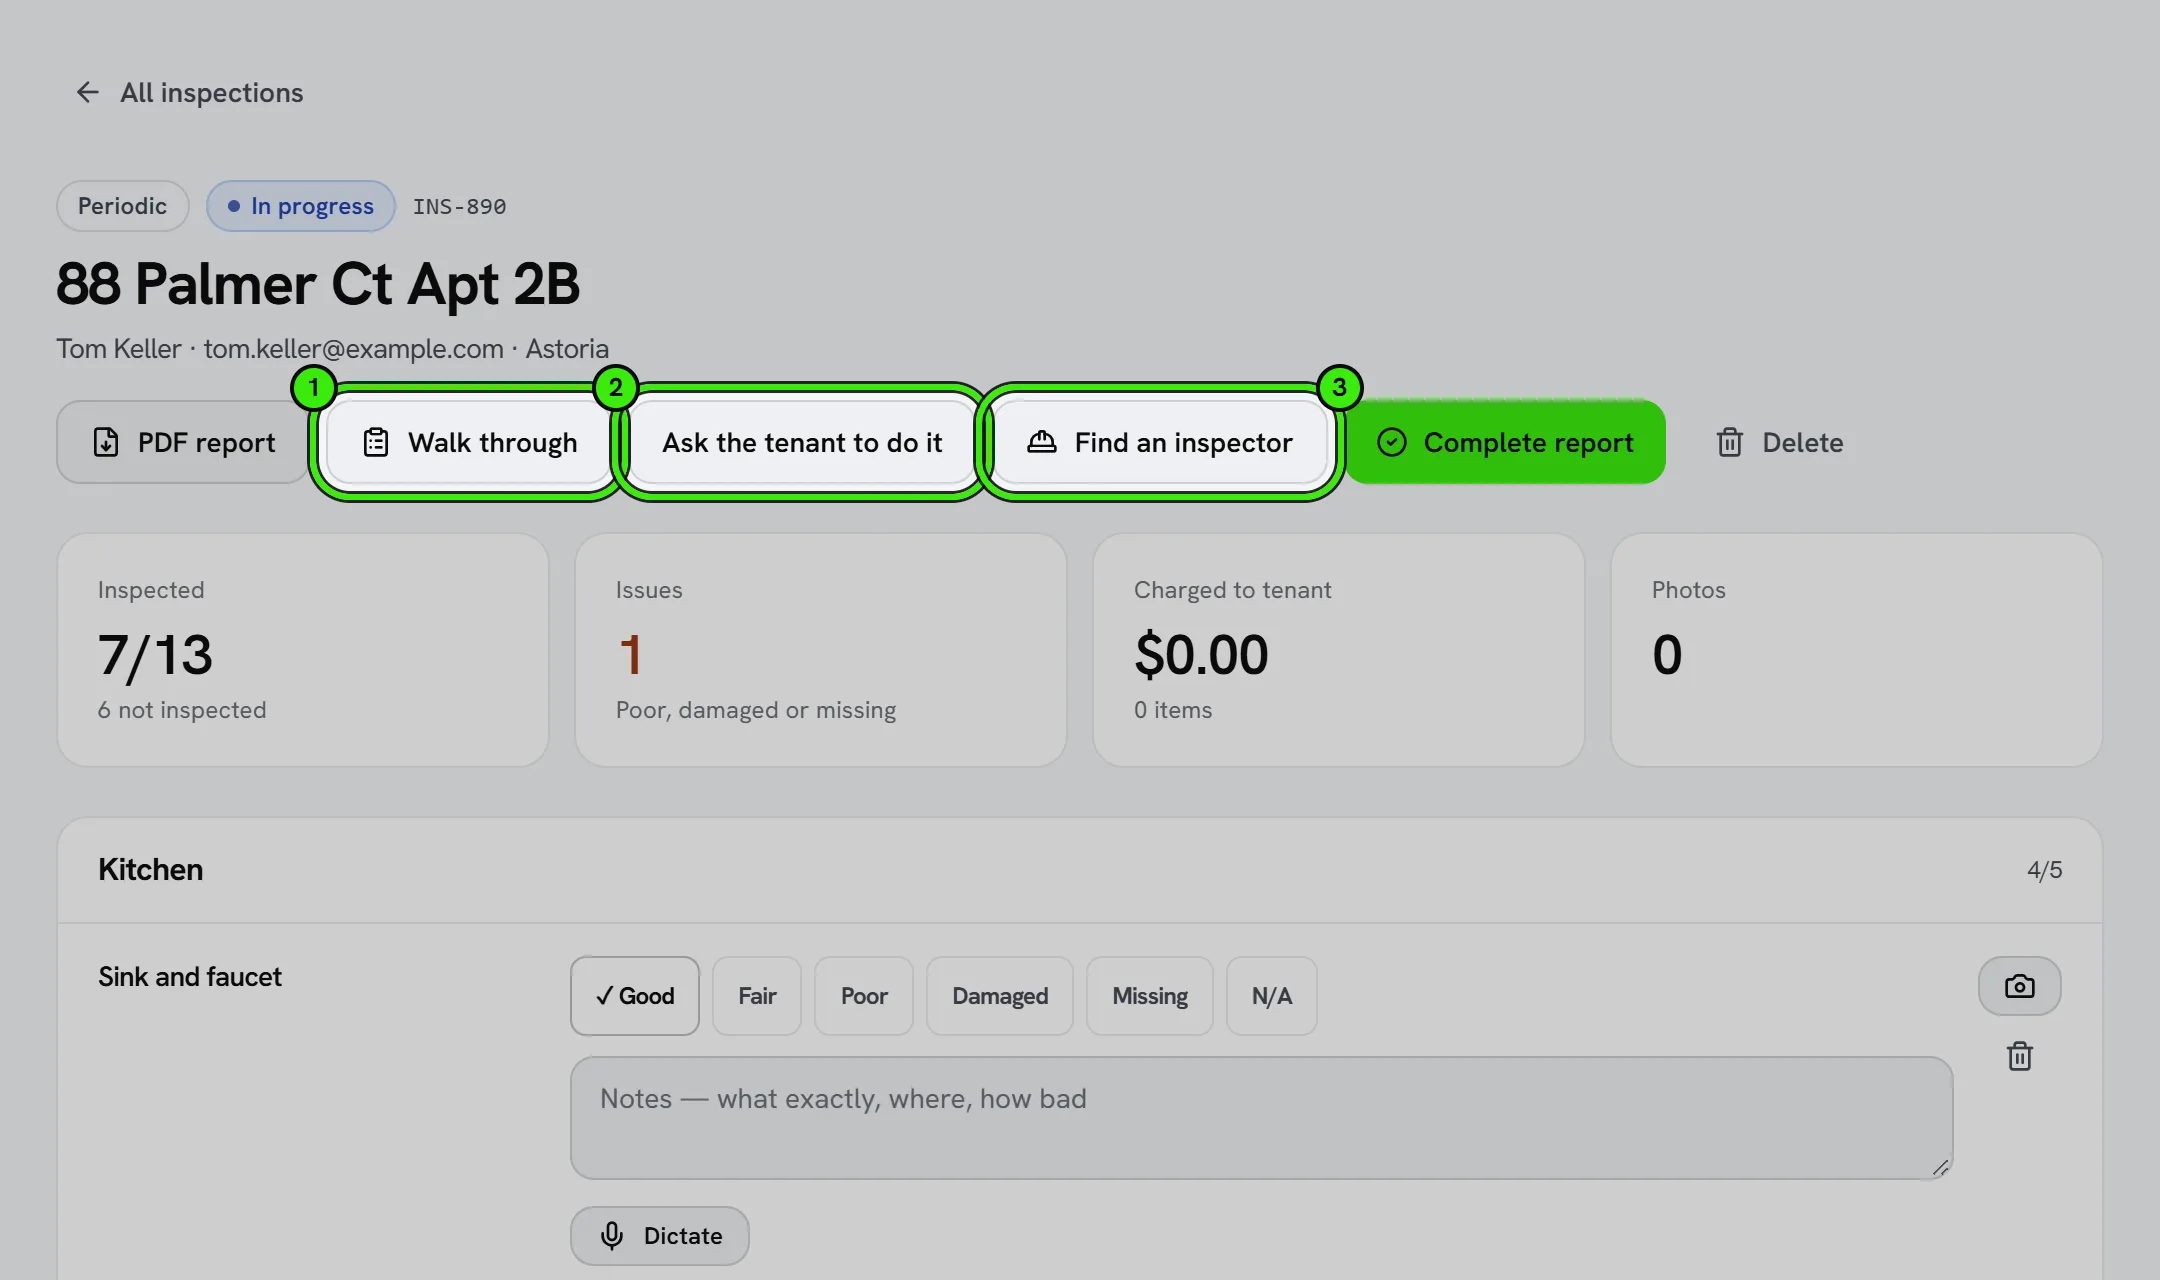
You do not have to walk the unit yourself. Open the inspection and choose “Find an inspector” and Seayora lists contractors from the marketplace who could do it, with the one thing that matters most next to each name: how we placed them.
- Based in that postcode, or listing that postcode as an area they cover — the strongest match.
- Based in that city, or covering it as a region.
- Based elsewhere in the same state — useful, but they may be a long drive away.
- We do not hold a service area for them — said in those words, never dressed up as “nearby”.
Beside that is the availability each contractor has set for themselves, how many jobs they currently have open, and whether they have worked for you before. It is what they set, not a live diary — and only Busy, Do not disturb and Away are shown, because the setting starts at Available for every account and a default is not a choice somebody made. Anything else reads “Not stated”, which is the honest answer: the difference is a wasted afternoon.
Handing over the report is a real change of hands: the contractor can open it and fill it in, they are emailed about it, and you stay the owner of record. “Take the report back” undoes it at any time.
On your phone, in the flat
The whole walk is on the iPhone and Android apps — conditions, notes, who pays, the estimated cost, photographs taken there and then, extra items the checklist missed, the general shots of each room, the checklist templates, the PDF, the audit trail, reopening a completed report, and answering a dispute. The report is frozen the moment you complete it, so it is meant to be done in one sitting, standing in the room.
Letting the tenant do it
On an open report with a tenant attached, choose “Ask the tenant to do it” and pick a due date up to 60 days out. The tenant gets an email and a notification, and the same inspection opens on their phone or computer: every room and item, what to photograph, the conditions, notes, photos, the hands-free walk-through, and a way to report a repair from any item.
- They record; they never charge. Who is responsible and what it costs stay yours on every screen, whoever is holding the phone.
- They can stop and come back. Nothing reaches you until they sign and submit, and they are reminded two days before the due date and on the day. If it goes past the date you are told once — nothing is locked by the calendar.
- When they submit you either accept it or ask for changes with a note. Asking for changes sends it back with everything they recorded still there.
- Accepting hands the report back to you to finish — add charges, your own notes, and complete it. What the tenant recorded and signed is kept, and anywhere you change it the report shows what they wrote beside it.
- The tenant then acknowledges or disputes the finished report like any other. Signing their findings is not agreeing to your charges.
- While it is with them you can move the due date, or take it back and finish it yourself; nothing they recorded is lost.
Automatic photo review
When a tenant submits an inspection they carried out, Seayora looks at each photograph attached to an item and says in one sentence whether it shows visible damage. Reports whose photos disagree with what was recorded — a photo that appears to show a crack on an item marked Good — move to the top of your list with “worth a look” beside them, and those items are marked on the report. On any other report, choose “Review the photos” to run it yourself.
- It is a suggestion about what to read first and nothing else. It never changes a condition, a note, who is responsible or what anything costs, it is not part of the completed report or its PDF, and your tenant does not see it.
- It describes what is visible, never the cause, who did it, whether it is normal wear and tear, or what it would cost — that judgment is yours, and in most states it is also the law’s.
- Only photos attached to an item are reviewed, each one once. Videos are not. A photo in a format the review cannot read, or one too large to send, is marked as not reviewed with the reason rather than passed over as fine.
- “The photo does not show enough to tell” is an answer too: too dark, blurred, or not of the item. It is never counted as no damage.
- It needs an AI engine that can read images. When none is configured the report says the photos have not been reviewed and why, rather than reporting that nothing stood out.
Walking it hands-free
Choose “Walk through” on an inspection that is still open and Seayora shows one item at a time: the room, the item, what to photograph, the conditions as large buttons, and a microphone. Tap Dictate and say the condition first, then what you see — “Damaged. Crack in the tile by the tub.” End with “next” and it moves to the next item on its own.
- Only the six condition names count, and only as the first word: good, fair, poor, damaged, missing, not applicable. “Cracked tile by the tub” is saved as a note and changes no condition — a list of synonyms would mark a working fixture damaged just for mentioning a crack.
- Everything else you say is added to the end of that item’s notes, on its own line, exactly as heard. It never replaces what is already there, and a note that would pass 4,000 characters is refused rather than cut short.
- “Next” or “skip” on its own moves on and saves nothing; “back” on its own returns to the previous item.
- After every save Seayora shows one sentence saying exactly what it recorded, so a misheard word is caught before the report is completed.
- An item you walk past is still recorded as not inspected, never as good.
Where the listening happens
On the iPhone and Android apps your speech is turned into text on the phone itself — the audio never leaves the handset, it works with no signal, and a phone that cannot do that says so rather than sending the audio away. On seayora.com the browser’s own speech recognition does it (Chrome, Edge and Safari; Firefox has none, and the page says so). Only the words reach Seayora. Every note field on an open report has the same Dictate button outside the walk-through as well; there it simply types into the note and saves it when you stop.
Keep it attached to the lease
Store both checklists as documents attached to the lease so they’re easy to find if a deposit dispute ever comes up months later.
Frequently asked questions
Who should be present for the move-in walkthrough?
Ideally both landlord and tenant, so both sides agree on the recorded condition. Where that isn’t practical, photograph the unit immediately before handoff and share the record with the tenant.
What counts as normal wear and tear?
Minor scuffs, small nail holes, and faded paint from ordinary living are typically normal wear and tear and shouldn’t be deducted from a deposit — actual damage beyond that is a different matter.
How many photos should a move-in checklist include?
Enough to cover every room and any existing issue — a handful of wide shots per room plus close-ups of anything unusual is generally sufficient to establish a clear baseline.
Can a tenant dispute the move-in checklist?
Yes — give the tenant a chance to review and flag anything they disagree with before both sides acknowledge it, so the record reflects a shared understanding rather than a one-sided assessment.
Can I get somebody else to do the inspection?
Yes. Open the inspection, choose “Find an inspector” and hand it to a contractor from the marketplace. They can then open and fill in that one report and are emailed about it; you stay the owner of record and can take it back at any time.
Why does a contractor show as “Not stated” rather than available?
Because the availability setting starts at Available for every account, so “Available” cannot be told apart from somebody who has never opened it. Only Busy, Do not disturb and Away are a choice somebody actually made, so those are the only ones shown — everything else says we do not know rather than implying they are free.
Can I inspect without typing?
Yes. Choose “Walk through” and dictate each item: say the condition first, then what you see, and “next” to move on. The words are added to the item’s notes exactly as heard, and the first word, if it is a condition, sets the condition.
Why did saying “cracked” not mark the item damaged?
Only the six condition names count, and only as the first word. A list of synonyms would mark a working fixture damaged just because a note mentions a crack, on the report a deposit deduction is built from. Say “Damaged” first, or tap the condition.
Is my voice recorded?
No. The phone apps turn speech into text on the phone and the audio never leaves it; on the website your browser does it. Seayora receives only the words, which are saved as the note.
Can my tenant carry out the inspection themselves?
Yes. Choose “Ask the tenant to do it” on an open report and pick a due date. They record each item on their own phone or computer, sign it and submit it; you accept it or ask for changes. They never set a charge, and once you accept it you finish the report as usual.
What if I change something the tenant recorded?
You can — once you have accepted their submission the report is yours to finish. But what they recorded and signed is kept, and wherever you change it the report shows both, so the finished document never quietly contradicts what the tenant said.
Can a tenant report a repair from the inspection?
Yes. Any item has “Report a repair”. It becomes an ordinary maintenance request, with that item’s photos attached, and goes to the landlord through the same rules as any other request.
Does the automatic photo review decide anything?
No. It points you at items whose photographs appear to show damage the report does not record, so you know which reports and items to read first. It never sets a condition or a charge, it is not part of the finished report, and your tenant does not see it. Every decision about a deposit is still yours.
Why does an item say the photo does not show enough to tell?
Because the photo was too dark, blurred, or not of the item the checklist names. That is a different answer from no damage, so it is never counted as a clean photo — ask for a clearer one, or look at the item yourself.
Related guides
Related features and guides
- Creating & E-Signing Leases — Documentation. How to build a lease, send it for electronic signature, and rely on the audit trail under ESIGN and UETA.
- Security Deposits on Seayora — Documentation. How to collect, hold, document, and return a security deposit — the ledger behind the figure, the statutory deadline, the itemized statement, and what freezes when.
- Documents & Storage — Documentation. How Seayora stores leases, applications, and uploaded documents, and your responsibility to retain your own records.
- Move-In & Move-Out Inspections — Feature. Run structured move-in and move-out checklists with photo evidence, so deposit deductions are backed by a dated record instead of a memory.
- Security Deposit Handling — Feature. Collect deposits through the platform, keep them tied to the lease and the unit, and back any deduction with dated move-in and move-out evidence.
- Document Storage & Templates — Feature. Store leases, addenda, inspection photos, receipts, and templates securely, with the right people able to reach the right documents at any time.